“`html
How to Take Screenshot on iPhone
Capturing your screen on an iPhone has never been easier or more useful. Whether you’re looking to save a meme, share a conversation, or document something important, knowing how to take a screenshot on iPhone is essential. In this guide, we will explore various methods and provide you with the latest tips and tricks for taking screenshots on your iPhone in 2025.
Understanding iPhone Screenshot Methods
Taking a screenshot may seem straightforward, but there are multiple methods you can utilize depending on your iPhone model. Each method serves a different purpose, allowing you to **capture iPhone screen** content quickly. Knowing these methods will enhance your overall iPhone experience as you will find the appropriate technique for every situation, whether you’re on an iPhone 13, iPhone XS, or even an older model.
The Classic Button Press Screenshot
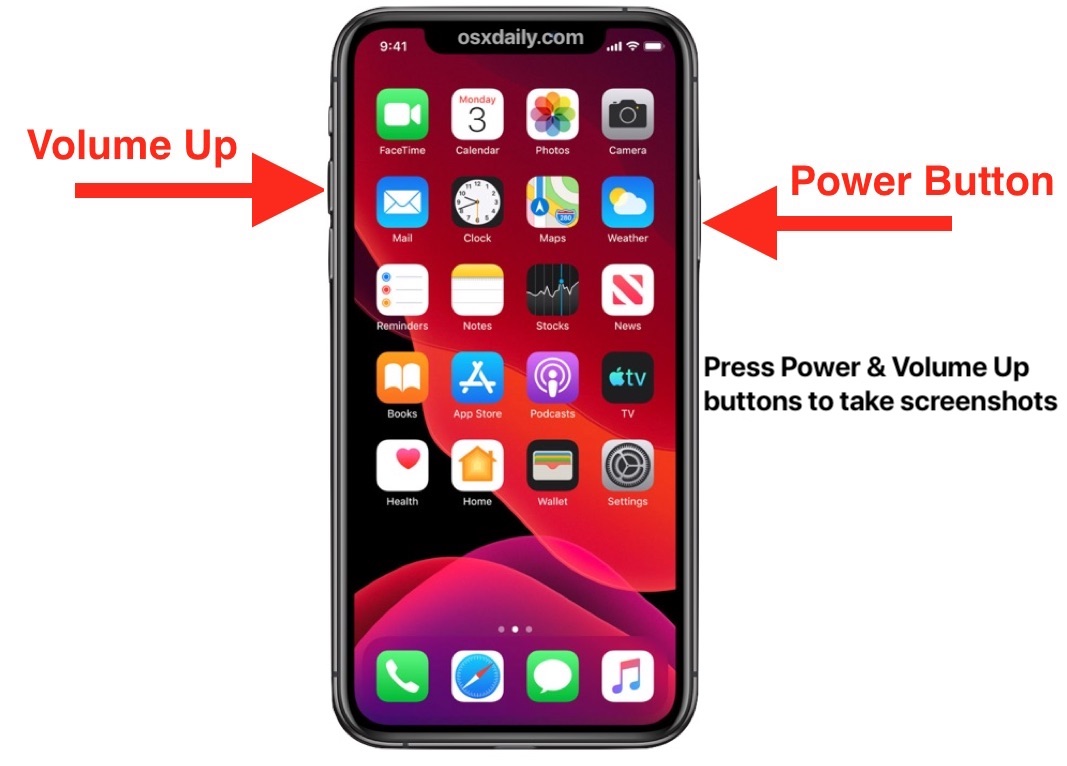
The most traditional way of taking a screenshot involves pressing the **Home** and **Power** buttons together. However, the button combination can vary based on your device. For iPhone models lacking a Home button, such as the iPhone X or newer, you’ll want to press the **Volume Up** and **Side** button simultaneously. This will instantly capture whatever is displayed on your screen. Once successfully taken, a thumbnail will appear in the bottom corner, providing options to edit or share the screenshot immediately.
Using Assistive Touch for Screenshots
If you’re finding it challenging to press buttons for screenshots, there’s an excellent alternative using Assistive Touch. This feature is especially useful for users with accessibility needs. To set this up, go to **Settings** > **Accessibility** > **Touch** > **AssistiveTouch** and enable it. You’ll notice a floating button on your screen that you can customize. Once set, tap this button, select **Device**, and then **More**, followed by the **Screenshot** option. This method promotes ease of use, offering a stress-free way of capturing your iPhone’s screen.
Capturing Parts of the Screen on Older Models
If you’re using an older model, the screenshot functionality works similarly to newer models, but there are slight differences in button configurations. Most older iPhone models, such as the iPhone 8 and older, operate on the principle of pressing the **Home** and **Power** buttons simultaneously. Once you become accustomed to the **iPhone screenshot steps**, you’ll be able to snap shots easily regardless of model. This highlights the adaptability of iPhone’s **screenshot functionality**, catering to various types of users.
Exploring iPhone Screenshot Features in iOS
The iOS software offers various features that can enhance your **screenshot experience**, including the ability to edit immediately after capturing an image, organize screenshots, and share them effortlessly. Whether you’re interested in adjusting the length or cropping for clarity, iOS has incorporated several tools to make the screenshot process smoother.
Editing Your Screenshots
Post-capture, an array of editing tools becomes available at your fingertips. You can crop, draw, add text, or highlight elements with a customary screenshot toolbar that appears after you take a screenshot. This is especially useful for those who want to clarify or emphasize specific elements for sharing in social media or documentation. So remember, after taking a screenshot, tap on the thumbnail to open editing options!
Finding Screenshots on Your iPhone
A common question new or transitioning iPhone users often ask is: Where do I find my iPhone screenshots? Your screenshots will automatically save to the **Photos** app in the **Screenshots** album. To access them, open the Photos app and look for the album titled “Screenshots.” This ensures that all your **screenshot iPhone history** is organized in one place, letting you easily manage and share the captured content.
Sharing Your Screenshots with Ease
Sharing your screenshots is a breeze on an iPhone. Once you capture your screen, the thumbnail makes it easy to send directly via messaging apps or social media. You can also choose **Send To** or **Copy** from the share menu to transfer it to your preferred application. This is an ideal way to integrate sharing directly into your workflows. Additionally, leveraging iOS features like AirDrop can expedite the process, particularly when sharing with nearby Apple devices.
Advanced Screenshot Tips and Tricks
While the basic techniques cover most users’ needs, savvy iPhone owners should understand how to enhance their screenshot capabilities. This can include capturing long screenshots or utilizing keyboard shortcuts for increased efficiency. Mastering these features can dramatically optimize your iPhone screenshot experience.
Taking Long Screenshots on iPhone
For those occasions where you want to capture more than just the visible screen, long screenshots are a game changer. Although iOS does not have a built-in feature for taking long screenshots automatically, third-party apps like Picsew or Tailor can help combine multiple screenshots into one long image. This is especially valuable for chats or lengthy articles, providing seamless documentation without excessive cropping. Such tools elevate your **screenshot iPhone** game by allowing you to gather large amounts of information in one image.
Using Siri to Capture Screenshots
Did you know Siri can help you with screenshots? Simply activate Siri and say, “Take a screenshot.” This hands-free method is a wonderful option for users who need a quick solution while multitasking or for those with accessibility preferences. Siri integration adds another layer of convenience to how you may choose to **capture your iPhone screen** in various scenarios.
Tips for Organizing Your Screenshots
As you take multiple screenshots throughout your day, keeping your photos organized becomes crucial. Consider creating specific albums for projects or topics. Utilize the **Photos** app features to favorited important screenshots or leverage the “Search” function to find items easily. Periodically clear out outdated screenshots to maintain a clutter-free space and optimize storage on your device. These little practices can greatly enhance the experience of taking and sharing screenshots on iPhone.
Conclusion
By employing the right methods and leveraging the specific iPhone features, capturing useful screenshots can become a routine and straightforward task. Whether through button presses, accessibility tools, or playful Siri commands, there’s a way to suit everyone’s style in taking screenshots on the iPhone. Stay tuned to our **iPhone screenshot guide** for updates on potential new features as we move through 2025 and beyond!
FAQ
1. How do I screenshot on an older iPhone model?
For older iPhone models like the iPhone 8, press the **Home** button and the **Power** button simultaneously. You’ll hear a shutter sound indicating that the screenshot was taken.
2. Can I take a screenshot without using buttons?
Yes! You can enable Assistive Touch in **Settings** > **Accessibility**, allowing you to take a screenshot through a floating button. Using Assistive Touch is an excellent alternative for users with accessibility issues.
3. Where can I find my screenshots once taken?
Your screenshots are saved in your Photos app under an album labeled **Screenshots**. This makes it simple to organize and access previously captured screenshots.
4. How can I edit my screenshots on iPhone?
Once you take a screenshot, tap on the thumbnail that appears. This opens the editing toolbar where you can crop, annotate, and highlight key areas of the image before saving it!
5. What are some apps recommended for long screenshots?
Apps like Picsew and Tailor are great for combining multiple screenshots into a single extended image, ideal for capturing longer content such as conversations or web pages.
6. Can I share my screenshots quickly?
Absolutely! After capturing a screenshot, the thumbnail offers sharing options for many apps. Tap it, and choose your preferred platform to quickly send your screenshot.
7. How to screenshot on iPhone XR easily?
To screenshot on iPhone XR, press the **Volume Up** and **Side** buttons simultaneously. The process is effortless and similar to newer models, ensuring ease of use.
“`